Reviewing Hand Drawn Planner Elements Set for Stitch
As a designer who spends half my life digitizing and the other half staring at hoop tension, I have learned that not every cute graphic translates well to thread. We often fall in love with Illustrations and Graphics on screen because they are crisp, colorful, and infinitely scalable. But embroidery is a tactile medium. It has weight, texture, and physical limitations. When I first opened the Hand Drawn Planner Elements Set, my initial reaction was cautious optimism. The playful, doodle-style aesthetic is undeniably charming, but charm does not always equal stitchability. I needed to know if these torn notes, paper clips, and checklist items could survive the transition from a digital digital embroidery file to a tangible finished product.
The Aesthetic: Playful Doodles Meet Thread Texture
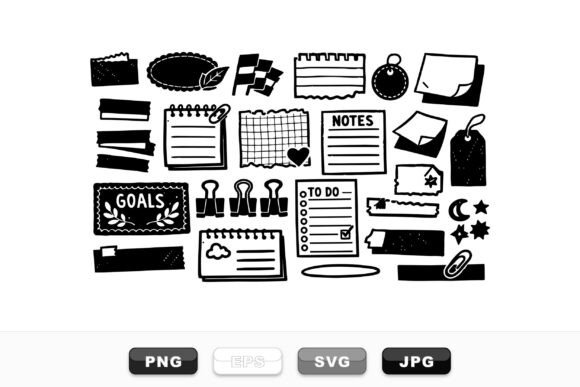
The visual personality of this set is distinctly informal. It mimics the look of a scattered desk or a beloved journal page. For an embroidery project, this loose, hand-drawn vibe is actually a strategic advantage. Perfectly geometric designs often highlight stitching errors, whereas organic, sketchy lines can mask minor tension issues. The mood here is approachable and nostalgic. It feels like something you would find in a boutique stationery shop, which makes it a strong candidate for lifestyle branding.
However, the complexity lies in the details. The set includes tiny elements like the teeth of a binder clip or the jagged edge of torn paper. In vector format, these are sharp lines. In embroidery, they become a series of stitches. My primary concern was whether the "torn" edges would look like intentional texture or just messy trimming. After reviewing the shapes, I realized that successful execution depends heavily on how we interpret these design assets for the needle.
Real-World Application: The Custom Tote Bag Test
To test the practical value of the Hand Drawn Planner Elements Set, I imagined a specific real-life scenario: creating a custom tote bag design for a local bookshop. The client wanted something that felt personal and creative, avoiding the stiff look of corporate logos. I selected the "to-do checklist" and a few scattered paper clip motifs from the set.
On a canvas tote, the fabric texture is coarse. This is beneficial for hiding the backs of stitches but challenging for fine details. I envisioned using a combination of running stitch for the outline of the checklist boxes and a light fill stitch for the shaded areas of the torn notes. The result, theoretically, would be a handmade product that looks artisanal rather than mass-produced. The playful nature of the doodles complements the ruggedness of the canvas, creating a balanced aesthetic that appeals to customers looking for unique, personalized gift items.
This same logic applies to sweatshirt embroidery. The soft, fuzzy surface of a fleece or cotton blend sweatshirt can swallow small details. Here, the larger elements of the set, such as the labels and bigger clips, would perform better than the tiniest scribbles. The goal is to create a custom apparel piece that feels cozy and inviting, where the embroidery adds texture without becoming scratchy or overly dense.
Navigating Technical Challenges and Fabric Choices
While the concept is strong, there are areas where caution is necessary. Embroidery designers must be realistic about stitch density and hoop size. If you attempt to stitch the entire sheet as one cohesive image, you will likely run into registration issues and excessive pull on the fabric. Instead, treat each element as a separate motif.
Consider the "torn note" elements. The jagged edges require precise digitizing. If you are converting the provided SVG or EPS files yourself, you must ensure that the corners are not too sharp, as this can cause thread breaks. On stretchy fabrics, like those used for baby embroidery on onesies, high-density areas can cause puckering. I would recommend using a cut-away stabilizer for these projects to maintain shape integrity after washing.
Dark fabrics present another challenge. The Hand Drawn Planner Elements Set relies on contrast. If you are stitching white doodles on a black hoodie, you need to ensure your underlay is sufficient to prevent the background fabric from showing through. Conversely, on light fabrics, you might opt for a satin stitch border to define the edges clearly. Always test your thread colors on scrap fabric first. What looks vibrant on screen may appear muted once stitched, especially with matte embroidery threads.
Commercial Viability for Etsy Sellers and Makers
For Etsy sellers and owners of a small shop product line, versatility is key. This set offers high commercial potential because it is modular. You are not selling just one design; you are selling a system of elements that can be mixed and matched. This allows for greater customization in commercial embroidery projects. You can create a simple patch for a cap using just one paper clip, or a complex composition for a pillow cover using multiple labels and notes.
The inclusion of JPG and PNG files in the downloadable ZIP is particularly useful for creating printable mockups. Before you even thread your machine, you can superimpose these graphics onto photos of blank garments to gauge visual appeal. This helps in building customer trust and professional presentation. Buyers want to see how the embroidered patch or design will look in context. High-quality previews can significantly boost buyer engagement.
However, always verify the licensing terms. While the product description mentions it is suitable for commercial use, confirming whether there are limits on the number of finished items you can sell is crucial for scaling your craft business. Never assume; always read the fine print to protect your brand consistency and legal standing.
Practical Designer Notes for Best Results
To get the most out of the Hand Drawn Planner Elements Set, keep these practical tips in mind:
- Start Small: Do not attempt to stitch the entire sheet at once. Break it down into individual components.
- Check Contrast: Use black and white mockups to ensure the design holds its shape without color reliance.
- Stabilize Properly: Match your stabilizer to your fabric weight. Lightweight fabrics need more support to handle the stitch density.
- Test Corners: Pay attention to the sharp corners of the "torn" paper effects. Round them slightly in your digitizing software to prevent thread bunching.
- Consider the Hoop: Ensure your hoop size accommodates the largest element you plan to use, leaving enough margin for clamping.
- Wash Testing: Always wash your test piece. Some threads shrink or bleed, which can ruin the clean look of the doodles.
In conclusion, the Hand Drawn Planner Elements Set is a versatile collection of Illustrations that, when handled with technical care, can elevate a standard embroidery project into something special. It bridges the gap between digital planning aesthetics and tactile craft. For the experienced designer, it offers a fun challenge in translating loose lines into structured stitches. For the hobbyist, it provides ready-made charm. Just remember: the magic is not just in the download, but in the thoughtful application of thread to fabric.